

How to make thermal metal siding installation with decorative finishes? Thermal metal siding panels have become one of the most efficient and aesthetically appealing cladding solutions for modern architecture. Thanks to their lightweight structure, polyurethane (PU) insulation core, and durable Alu-zinc coated steel surface, they are widely used in residential, commercial, and industrial buildings.
These panels are not only thermal insulation functional but also decorative: they are available in brick imitation, stone imitation, and wood imitation patterns, making them ideal for projects where insulation performance and curb appeal must go hand in hand. Typically, these panels come with a 16 mm thick polyurethane foam core bonded to a 0.25 mm AZ100 Alu-zinc pre-painted steel skin.
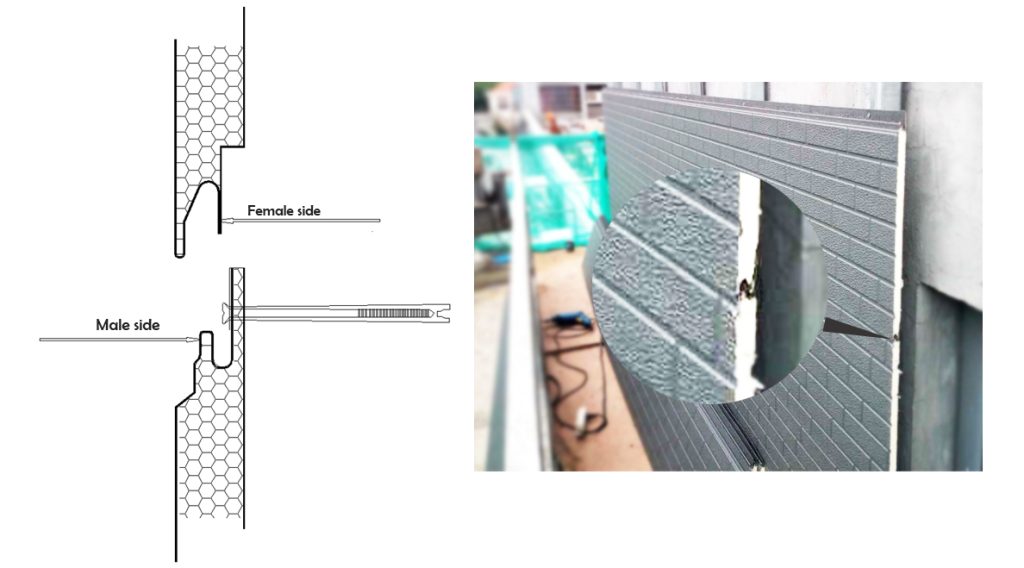
One of the main features of this system is the tongue-and-groove joint (male and female interlock type), which allows for fast installation and a seamless, weather-tight finish. Below, we will discuss how to properly install thermal metal siding panels step by step.

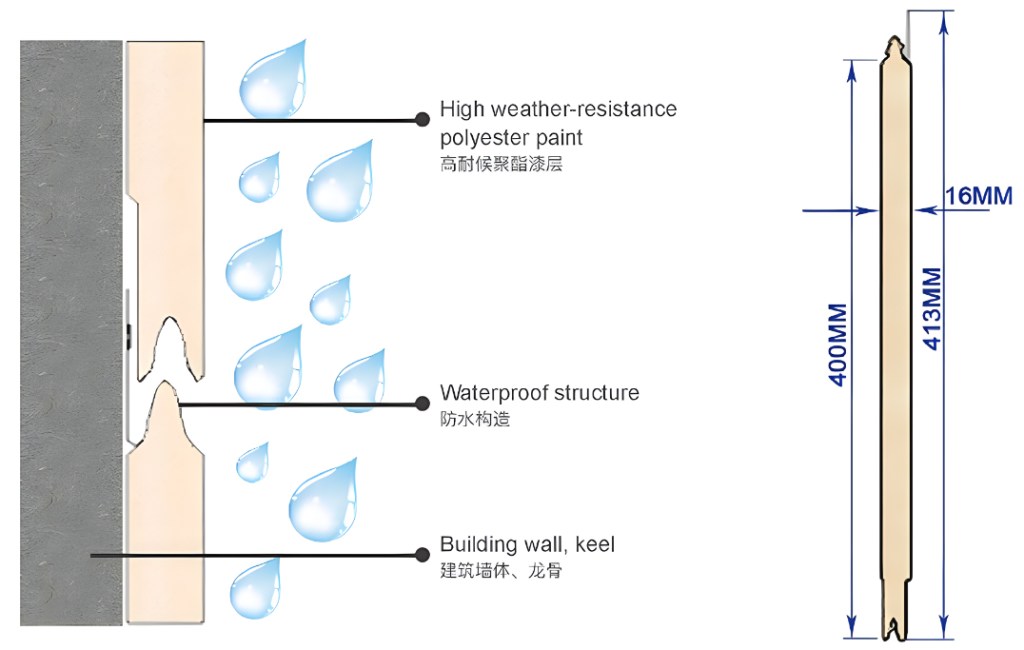
Table of Contents
Tools and Materials Needed
Before starting installation, prepare the following tools and accessories:
- Measuring tape and chalk line
- Spirit level and plumb line
- Circular saw with metal/PU cutting blade or hand shears
- Screw gun or drill driver
- Self-tapping screws with sealing washers
- Starter strips and corner trims (metal profiles)
- Sealant tape or PU foam (optional for extra airtightness)
- Safety gear (gloves, goggles, helmet)
Step 1: Prepare the Wall Surface
Thermal insulated metal siding panels can be installed over concrete, masonry, or steel framing systems. To ensure proper performance:
- Check wall flatness: The substrate should be level and free of debris. Uneven surfaces may cause misalignment of panels.
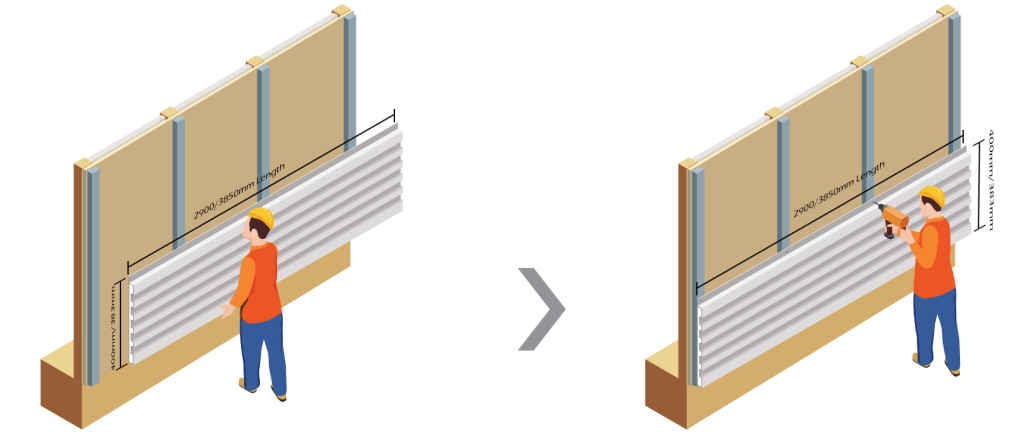
- Install vertical battens or steel furring strips: If needed, fix galvanised steel channels or treated timber battens at regular spacing (usually 400–600 mm apart). These act as fixing points for the siding panels.
- Install starter strip: At the bottom of the wall, fix a continuous starter profile to support the first row of IND panels. Make sure it is perfectly level, as this determines the alignment of the entire façade.
Step 2: Panel Layout and Cutting
- Measure wall dimensions to determine how many panels are required and where cuts will be necessary.
- Panels should be cut with a circular saw equipped with a fine-tooth blade suitable for metal and PU foam. Avoid using angle grinders, as they may damage the protective coating.
- Always cut panels from the backside to protect the decorative surface.
Step 3: Installing the First Panel
- Place the female edge of the first panel onto the starter strip, leaving the male edge facing upward for the next panel to interlock.
- Ensure the panel is vertically plumb and properly aligned.
- Fix the panel to the substructure using self-tapping screws with sealing washers, generally at the top and bottom of the panel, or as per the manufacturer’s guidelines.
- Do not overtighten screws—this may distort the panel surface.
Step 4: Interlocking Subsequent Panels
- Insert the female joint of the new panel down into the male groove of the installed panel. The tongue-and-groove connection ensures tightness and thermal continuity.
- Gently tap with a rubber mallet (if needed) to achieve perfect interlock without damaging the surface.
- Continue fixing each panel to the substructure using screws at recommended intervals (usually every 600–800 mm along the support).
- Progress across the wall from bottom to top and from one corner towards the other.
Step 5: Corner Treatment and Trims
- Outside corners: Use pre-fabricated corner trims that match the panel finish (brick, stone, or wood imitation) or the plastic-coated aluminum alloy trims. Panels should be cut neatly to fit behind the corner trim.
- Inside corners: Use dedicated inside corner profiles or angle trims to cover the joint.
- Window and door openings: Install J-trims or U-profiles to finish edges around openings. Panels must be cut precisely to fit snugly.
- Top finishing: At the top of the wall, install a cap trim or flashing to protect the upper edge from water infiltration.
Step 6 (Optional): Sealing and Thermal Performance
The interlocking design already provides excellent thermal and weather performance. However, for enhanced airtightness:
- Apply sealant tape or PU foam in the joint if the building is located in areas with high wind load or heavy rainfall.
- Around window frames and penetrations, ensure proper sealing with weatherproof caulking.
Step 7: Final Inspection
- Check that all panels are securely fastened and joints are tight.
- Verify alignment both horizontally and vertically.
- Inspect trims and flashings for neat finish and proper sealing.
- Clean the panel surfaces with soft cloths to remove any installation dust or debris.
Advantages of Thermal Metal Siding Panels

- Superior insulation: 16 mm PU foam provides high thermal resistance and energy efficiency.
- Decorative versatility: Brick, stone, or wood imitation patterns offer architectural freedom.
- Durable protection: 0.25 mm AZ100 Alu-zinc coated steel resists corrosion, UV exposure, and weather.
- Lightweight and fast installation: Interlocking male/female design reduces labor time.
- Low maintenance: Pre-finished surfaces require minimal upkeep.
Common Applications
- Residential houses requiring aesthetic façades with insulation
- Commercial buildings such as showrooms and retail stores
- Industrial warehouses and prefabricated offices
- Renovation projects where exterior insulation and finish are needed simultaneously
Thermal Metal Siding Installation is Easy and Simple

Installing PU insulated metal siding is a straightforward process when following proper preparation, alignment, and fixing steps. The male/female interlock system ensures a clean, seamless façade while maintaining excellent thermal performance. With decorative options such as brick, stone, and wood imitation finishes, these panels combine beauty with durability, making them an ideal solution for energy-efficient, long-lasting cladding projects.
FAQs


1. What thickness is recommended for thermal metal siding panels?
Most decorative insulated panels use a 16 mm polyurethane foam core, balancing thermal insulation and lightweight handling.
2. Can these exterior metal siding panels be installed directly on concrete walls?
Yes, panels can be fixed directly to concrete, but it is often recommended to install steel or timber battens for precise alignment.
3. How are thermal siding panels joined together?
They use a male/female tongue-and-groove joint system for fast, weather-tight, and seamless installation.
4. Do I need additional insulation behind the panels?
In most cases, the PU foam core provides sufficient insulation, but additional layers may be added in very cold climates.
5. What surface options are available?
Panels come in brick imitation, stone imitation, and wood grain finishes, offering both decorative appeal and durability.
6. How durable is the surface coating?
The 0.25 mm AZ100 Alu-zinc color steel surface offers strong corrosion resistance and long service life.
7. Can panels be reused if removed?
Yes, if removed carefully, panels can be reused, though sealant and trims may need replacement.
8. Is special equipment required for cutting?
A circular saw with a fine-tooth blade designed for metal and foam is recommended. Avoid angle grinders.